DISCOVER HOW TO CREATE POWERFUL LANDSCAPE IMAGES
- Capturing a dramatic landscape takes a lot of technique and skill.
- Almost everyone at some point has taken a photograph and been surprised when the picture doesn't look nearly as dramatic as the landscape did in reality.
This course will explain how to capture what you experience in the moment and transport that same 'feel' into your images.
WHAT THE COURSE COVERS
You will learn a wide variety of things, through a combination of reading, interacting with tutors, undertaking research and practical tasks, and watching videos. Here are just some of the things you will be doing:
- Basics of photography.
- Starting a resource file.
- Principles of landscape photography.
- Selecting the right equipment and materials.
- Using filters.
- Dealing with a range of problems found in natural areas, including uneven light, shade, glare, etc.
- Photographing buildings and streetscapes.
- The characteristics of water and its affect on photography.
- Selecting and composing a photograph to create the predetermined affect.
- Create a folio of landscape photographs.
Lesson Structure
There are 8 lessons in this course:
-
Introduction
-
Different Approaches ... realistic, impressionistic, abstract
-
Understanding the landscape (components, change)
-
Lighting (Shooting into the sun, time of day, weather)
-
Using Filters (Polarising, ultra violet, red, orange, yellow)
-
Snapshots
-
Equipment
-
Camera settings (Shutter speed, aperture,)
-
Introducing Digital Technology
-
CCD’s
-
Resources
-
The Main Principles
-
Open view scenes
-
Closed view scenes
-
Rule of thirds
-
Unity
-
Balance
-
Proportion
-
Harmony
-
Contrast
-
Rhythm
-
Line
-
Form
-
Mass
-
Space
-
Texture
-
Colour
-
Patterns
-
Tone
-
Other compositional components
-
Camera Techniques
-
Movement
-
Depth of field
-
Angles
-
Framing the landscape
-
Creating Different Effects
-
Landscape effects
-
Sunrise and Sunset
-
Weather effects
-
Haze
-
Mist
-
Rain and Rainbows
-
Storms
-
Exposures for landscapes
-
Sun
-
Clouds
-
Creating intense colour
-
Creating different effects
-
Scenic Photography
-
Digital filter effects (Coloured pencil, fresco, sponge, blur, etc)
-
Hue/Saturation
-
Digital toning
-
Photographing Natural Areas
-
Locations (Arid desert, Arctic ice flows, volcanic peaks, tropical rainforests, etc)
-
Grasslands
-
Forest
-
Mountains
-
Rural areas
-
Tropical Rainforest
-
Desert
-
Wetlands
-
Snow photography
-
Coastal plotography
-
Photographing plants
-
Compositional elements
-
Lenses
-
Shooting in bad weather
-
Extreme temperature
-
Extreme Cold
-
Extreme heat and humidity
-
Photographing Streetscapes
-
Modern buildings
-
Historic buildings
-
Viewpoints and perspective
-
Equipment
-
Photographing architecture at night
-
Mirrors and reflections
-
Exposure readings
-
Converging lines
-
Tips for architectural photos
-
Tips for street photography
-
Photographing Water
-
Water characteristics
-
Reflections
-
Exposures
-
Creating effects with water
-
Water in motion
-
Freezing movement
-
Achieving a soft artistic effect
-
Droplets
-
Using filters with water
-
No tripod
-
Seascapes
-
Underwater photography
-
Exposures
-
Developing Your Photographic Style
-
Styles & work of famous photographers (Ansel Adams, Paul Caponigro, Thomas Joshua Cooper, John Davies , David Doubilet, Carleton E Watkins, etc)
-
Developing a photo style
-
Hints on style
-
Photographing detail
-
Atmosphere
-
Trip or Photographer Themes
-
Know your equipment
-
Computer Techniques (Levels, Channel extraction, Channel mixer, Duotones, Hand tinting, Panoramas)
-
Major Project
-
Uses for Photography
-
Using your work to get a job
-
Photojournalism
-
Freelancing
-
Publishing
-
Form of photo
-
Creating a website
-
Creating works of art
-
Framing
-
Creating a Folio
-
(In this lesson, you create either a photo essay or a folio as a major project)
Aims
-
Discuss the nature and scope of photographing landscapes.
-
Develop a firm understanding of how you can work at improving your capabilities with respect to taking landscape photographs.
-
Develop a framework, upon which you will base your work in future lessons.
-
Increase the variety of effects which you are able to create when photographing landscapes.
-
Develop your capacity to take better photographs of natural areas.
-
Develop your capacity to take better photographs of buildings and streetscapes
-
Develop your capacity to take better photographs of water landscapes.
-
Develop your flexibility of being able to capture landscape images in different photographic styles.
-
Develop a folio of quality landscape photographs.
The best landscape photos have a strong and immediate impact
 What is Impact?
A successful image will impress and capture the attention of anyone looking at it, quickly and significantly. Some may like an image, while others may hate the same image; but both will be drawn to look at it - having their attention taken away from everything else that surrounds the image.
- Try to cultivate simplicity, avoiding the inclusion of too many components in the photo.
- Look to compose a photo where a single component dominates
The Time of Day
Choose different times of day to create different types of images. The same image can look very different at midday to what it does early morning or late afternoon.
Natural Lighting Effects
Look for the light filtering through trees and between hills at watch how it falls across the landscape. This may help define the form or highlight interesting areas of the scene.
Simplify
Don’t hesitate to crop an image to make it tighter, to exclude unnecessary components to strengthen the attention upon the prime component. Do however avoid cropping pictures so the process dissects trees or mountains or clouds in the shot; this is annoying to the viewer, causing the viewer to want to see the cropped off part (not in the frame). The aim is to encourage the viewer’s eyes to travel over the composition of the image not to look for missing parts, but to enjoy the image as it is presented.
Choose Good Subject Matter
Include people or animals in a scene, where it is ‘natural’ to do so, in other words if the image would look unnatural without their inclusion. Be careful however to avoid a person or animal becoming the prime focus - if it is not the main purpose of the shot.
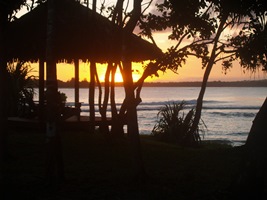
A building which has a person in front of it can be appropriate, if the building is much larger than the person and overwhelms the person in the image. It can also add a sense of scale to the photo give an indication of the size of an object in relation to the size of the person. A silhouette of a person in a sunset may be appropriate where the colour of the sunset is dominant, and the detail of the person is lost - so it is no more than a blackened shape contrasting against the coloured light.
Keep it to Scale
A person in the image can also give you an idea of scale (as discussed earlier with the building/person example. Another example: a surfer ready to dive into the ocean from a rock with huge cliffs in the background, gives the scene a sense of the scale and drama, similarly a waterfall or huge tree can create the same effect.